Tag: Making Things

Repurposed Jewelry Stand

Repurposed Jewelry Stand

Here’s a great way to use up your mismatched china collection from garage sales over the years. This project couldn’t be simpler and makes a beautiful jewelry stand while displaying those pretty little plates. Just use superglue or my personal favorite, E6000 (it’s waterproof) with 

Water Drum to Composter

Water Drum to Composter

We’re getting ready for spring around here and I thought I’d share an idea the hubby came up with a few years back for an easy, clean composter. First, take an old water drum. This one is 55 gallons and has a screwtop lid. Drill 

Easy Jelly Roll Race to Postage Stamp Quilt

Easy Jelly Roll Race to Postage Stamp Quilt

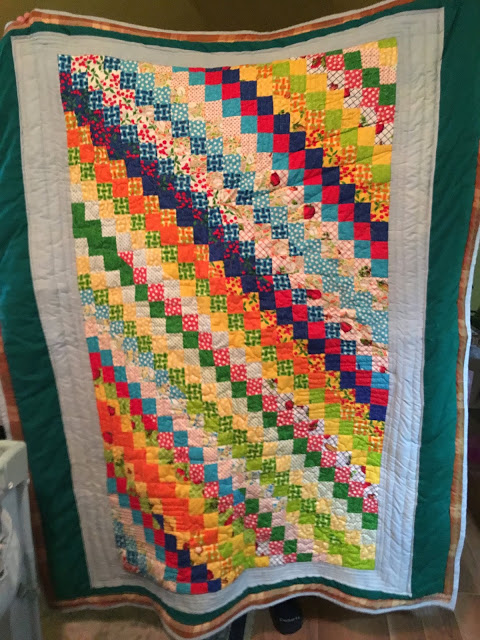
Two bucket list projects from 1 jelly roll, and I highly recommend! This began as a jelly roll race (a blast for every quilter or quilting dabbler to try), and then became my Holy Grail postage stamp project. This was so satisfying because it was so much easier than it looks and I think the natural stripe pattern is quite pleasing. I used a tutorial I had seen on Pinterest (here) where the finished jelly roll was joined at the ends to make a tube, the tube was sliced into 2 inch square strips (rings), and then the seam was ripped according to the pattern. For example, if one strip was topped with the cherry pattern, the next strip would be topped with the blue and turquoise brick fabric to keep with the diagonal pattern. It requires organization for keeping all the strips in order of cutting, but made the postage stamp teeny squares come together very quickly. I made this for our beloved neighbors and babysitter to our son. See links below for directions.

(Postage Stamp Quilt using a Moda Eat Your Fruits and Veggies Jelly Roll. Started as a Jelly Roll race and turned to Postage Stamp quilt when the material looked too busy. Great project, even for a beginner!)

Reupholstering with Burlap

Reupholstering with Burlap

Reupholstering was something I thought a Renaissance gal should know how to do, like chopping wood or hemming pants. But it can get expensive, so why not try it with something frugal like burlap? These ghastly chairs made the perfect victims. Getting them apart was 

Dress Up an Old Hat

Dress Up an Old Hat

Believe it or not, this lonely old sunhat was sitting in a pile of free stuff, ready to be kicked to the curb. Until I snatched it up. I found a cheery ribbon, a little glue, and voila! Thank goodness we still have a couple 

My First Quilt Square

My First Quilt Square

One small step for the community quilt ladies, one giant step for a fledgling sewer!

Mason Jar Chandelier

Mason Jar Chandelier

Walking around downtown Petaluma last weekend, I glimpsed in this antique store window and nearly kept on walking. Then, upon closer look … I saw a mason jar chandelier and my heart nearly stopped. And not only with mason jars, but blue mason jars! I 

The Vardo

The Vardo

With Maker Faire just around the corner, it seems like everyone’s getting into the maker spirit around here. And wouldn’t you know, the master craftsmanship of Paleotool created this adorable, yet extremely funtional, gypsy caravan deemed “The Vardo”- complete with a bed, stove, and ample 

My First Quilt- In the Works

My First Quilt- In the Works

Ever have a craft project you’ve been planning for months? How about years? 

For me, the corduroy quilt has been in the making since high school, when a dear friend of mine made a duvet cover and an overnight bag out of mismatched corduroy pieces. She has always had a knack for sewing and crafting and busted those projects out like nobody’s business. What made the pieces so interesting was the different sizes of squares, and the colors and textures of the corduroy. I also loved making something so functional out of scrap pants, and my inspiration has been stewing ever since.

I must admit, collecting the right pieces of corduroy was the first challenge.

And also, learning how to sew. There was no way this would be made by hand. But I was running out of excuses once I had my grandmother’s machine for over a year, so I finally got cracking.

Ironing the fabric and cutting out the squares is the first step. I was wisely advised to make my first quilt with same-size squares. (So glad I listened!)

Because I had different amounts of fabric, I wanted everything cut before I started to design my layout. I liked the softness of the pink and light blue with the brown and tan color sequence. I’m thrilled the cords are all different widths and textures to make it more interesting and touchable.

This is the fun part- making the design! Here’s an experiment with the random look. Hmmm.

Then I tried laying it out into more of a steady pattern.

Yes, this is so much better! I arranged based on the number of squares available, and now I can start sewing the strips.

My main goal with this project is to get more comfortable sewing simple, straight lines on the machine, as well as loading bobbins since this uses so much thread. All the stitching is on the back, so there’s a lot of leeway with mistakes, making this a perfect project for a beginner. Even if it’s a big one!

After several afternoons working on the stitching over the course of two months, I have finally sewed all 12 strips of 10 squares, and combined them all for the front of the quilt! It is a huge accomplishment for me, since there were “sessions” where I couldn’t get through more than a couple squares without the bobbin acting up and my temper flaring to a string of obscenities sure to make my dead grandmother blush.

The worst was when I had all a panel of 3 strips attached next to another panel of 7 strips, only to find they didn’t match up. I had to rip out the seams of all 3 strips and reattach them. This mistake took 10 minutes to initially sew together, and about 3 hours to rip out. Ripping out seams is now my greatest personal hell.

Sewing is nothing if not a serious test in patience.

Next will be finding a border, the backing, and figuring out how it can be fitted over a comforter. Happy the end is in sight, but don’t mind putting it aside for a few weeks so I can recharge and get my bearings.

Remind me if I ever want to work in a sweatshop that my skills would be put to better use elsewhere.

The Old Sewing Box

The Old Sewing Box

For most of my life, it seems I’ve been in a constant battle to organize my craft projects. This year, I made the goal to approach learning to sew on my grandmother’s machine, a terrifying prospect for many reasons. Particularly because it means opening the